If you've searched for "API form," you've probably hit two completely different things: travel sites talking about APIS (the Advance Passenger Information System) and developer docs about sending form data to a REST API. This guide is firmly about the second. It's a practical, code-forward walkthrough for developers: what an API form actually is, how the request and response work, how to send form data from the browser and from your backend, how to receive submissions reliably, and how to secure the whole thing. The snippets are minimal and copyable, and the patterns are the standard web ones, not framework-specific magic.
What Is an API Form
An API form is a form whose submissions are sent to, or served by, an API endpoint instead of being handled by a built-in form processor. Rather than the browser's default form post reloading the page, the form data is sent as an HTTP request (usually a POST) to a URL that accepts it, validates it, stores it, and replies with a structured response, typically JSON. That endpoint might be your own backend, a third-party service, or a form platform's REST API.
To be unambiguous, since the term collides: this has nothing to do with the travel industry's APIS form (Advance Passenger Information). In the developer sense, "API form" just means a form wired to an API, you control where the data goes and what happens next, instead of relying on a hosted handler and a thank-you page. That control is the whole appeal: you can route submissions into your own systems, trigger workflows, validate server-side, and return a custom response. The rest of this guide is how to do it.
Why go to the trouble instead of a hosted form with a thank-you page? Three reasons developers reach for an API form: integration (responses flow straight into your database, CRM, or queue), customisation (you return your own response, redirect, or in-app update instead of a generic confirmation), and control over validation and logic (you decide server-side what's valid and what happens next). If none of those matter, a hosted form is simpler; if any do, an API form is the right tool.
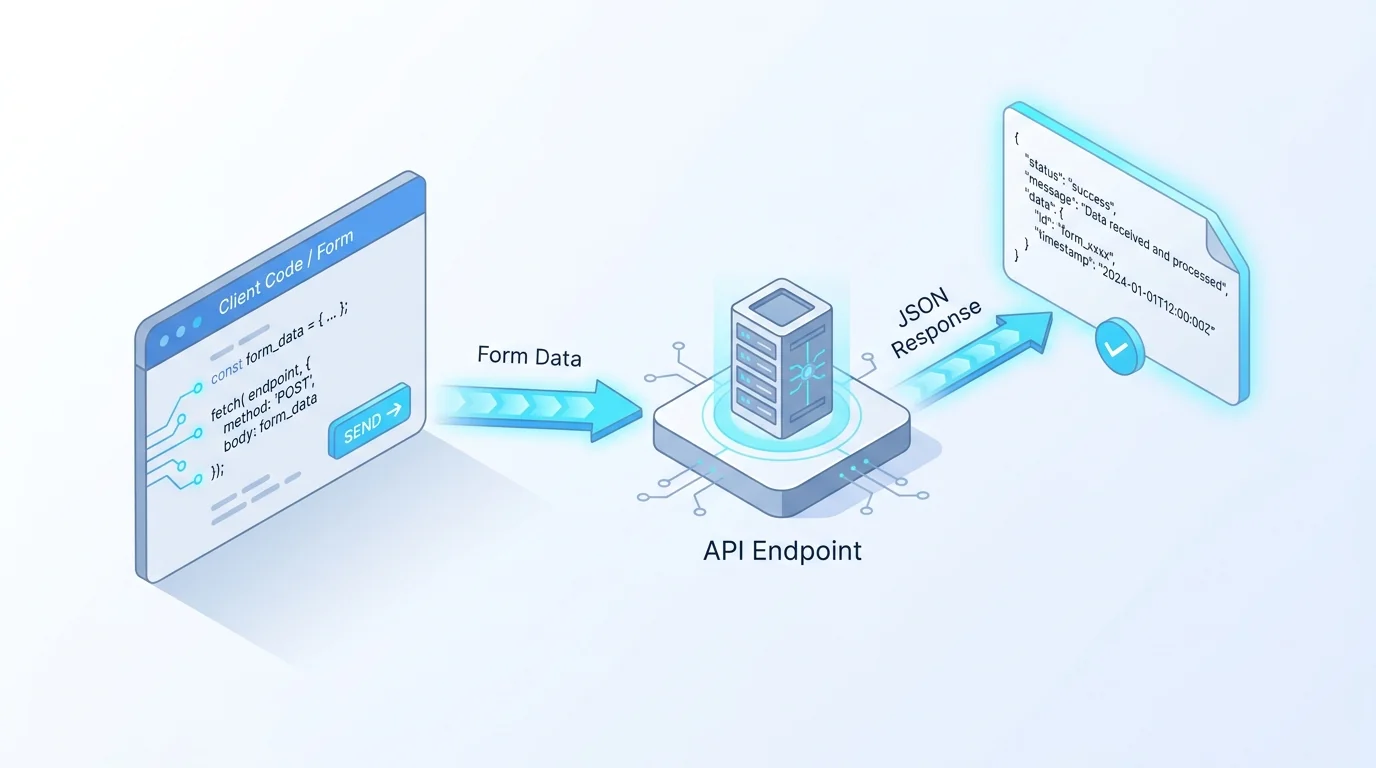
How an API Form Works: Request and Response
At its core, an API form is an HTTP request and a response. The browser (or your server) sends a POST to the endpoint with the form data in the body, and the endpoint replies with a status code and usually a JSON payload.
The first decision is how to encode the body. There are two common choices. multipart/form-data is the format the browser uses for native form posts and is required when the form includes file uploads, it packages each field (and file) as a separate part. application/json is cleaner for structured, text-only data and is the norm for API-to-API calls. As a rule: use multipart/form-data when you have file uploads or are sending a raw FormData object, and JSON when you're sending structured fields from your own code. MDN's reference on the POST method covers the encodings.
The response is where you handle success and failure. A 2xx status (often 200 or 201) means accepted; 4xx means the request was wrong (validation failed, auth missing, 429 for rate limiting); 5xx means the server erred and the request may be worth retrying. The status-code semantics are standardised in IETF RFC 9110. Designing your form around these, read the status, surface validation errors from the JSON body, retry only on the right ones, is what separates a robust API form from one that silently loses data.
Two response details are worth getting right from the start. First, idempotency: network retries can cause the same submission to arrive twice, so if duplicates would cause problems (a double charge, a duplicate lead), design the endpoint to deduplicate, often via a client-generated idempotency key. Second, error shape: return validation errors as structured JSON (which field failed and why), not a bare 400, so the client can show the user exactly what to fix. A predictable response contract is what makes an API form pleasant to build against.
How to Send Form Data to an API From the Browser
The browser-side pattern is fetch plus FormData. You intercept the form's submit event, build a FormData from the form, and POST it. Here's the minimal version:
A few notes on this pattern. Passing a FormData object as the body lets the browser set the multipart/form-data content type (with the right boundary) for you, don't set that header by hand, or you'll break the encoding. event.preventDefault() stops the default page-reloading submission so your fetch runs instead. And always check response.ok before assuming success; a 400 with a JSON list of validation errors is a normal, expected response you should surface to the user, not an exception to swallow. If you'd rather send JSON, build a plain object from the form (Object.fromEntries(new FormData(form))) and JSON.stringify it with a Content-Type: application/json header instead. MDN's guides to sending forms through JavaScript and the FormData interface are the canonical references.
One more browser-side consideration: CORS. If your form page and the API are on different origins, the API must send the right CORS headers or the browser will block the request, a frequent first stumble when posting directly to a third-party API from the client. If you control the API, configure CORS to allow your form's origin; if you don't, that's another reason to proxy the request through your own backend, which isn't subject to CORS.
How to Submit a Form to an API From Your Backend
Often you don't post straight from the browser to the final API. Instead the browser posts to your server, which validates, adds secrets, and forwards the data to the API, keeping keys off the client. The server-side call is the same idea with JSON:
The server-side route has real advantages: your API key never reaches the browser, you can validate and sanitise before forwarding, and you can implement retries on 5xx/429 with exponential backoff without exposing that logic publicly. The trade-off is an extra hop and a backend to run. If you're posting to a form platform's REST API specifically, the request shape (endpoint, auth header, body) is defined by that platform, our companion guide to submitting forms from your backend over REST documents one such endpoint end to end, so this guide won't re-document it. The general principle holds regardless of platform: POST the data, authenticate with a secret key from an environment variable, and branch on the response status.
Receiving Submissions: Webhooks vs Polling
Sending the data is half the job; receiving it where you need it is the other half. There are two models. Polling means your system periodically asks the API "any new submissions?", simple, but it wastes requests and adds latency between submission and processing. Webhooks flip it around: the API pushes each submission to a URL you provide, the moment it arrives. For form submissions, webhooks are almost always the better choice, they're real-time and efficient.
The catch with webhooks is reliability and trust. Networks fail, so a good webhook system retries failed deliveries (with exponential backoff) rather than dropping them, and to prove a request genuinely came from the API rather than an attacker, it signs each payload, typically an HMAC signature in a header that you verify with a shared secret. The pattern of a signed, retried webhook is worth understanding before you rely on it; we cover it in depth in signed webhooks that retry. The short version: verify the signature on every webhook, return a 2xx quickly to acknowledge receipt, and do slow work asynchronously so you don't trigger a retry by timing out.
It's also worth designing for the occasional duplicate. Because a webhook may be retried after a delivery that actually succeeded (the acknowledgement got lost in transit), your receiver should be idempotent: processing the same submission twice should be harmless. A common approach is to record each submission's ID and skip any you've already handled. Between signature verification, a fast acknowledgement, and idempotent processing, you get a webhook receiver that's both secure and reliable.
Securing Your Form API
An API form is a public-facing input, so security is not optional. The essentials:
API keys, split by environment. Use a publishable key for client-side submission and a secret key for server-side calls, never put a secret key in browser code. A common, sensible model is a publishable key that's safe to expose (it validates the request's origin) and a secret key that stays on your server (and can be restricted to specific IPs). Keys should support test and live modes and be rotatable, so a leaked key can be revoked without downtime. Allowed origins. For client-side keys, restrict which domains may submit (origin checks), so the key can't be reused from another site. Anti-spam. Add a CAPTCHA or an invisible honeypot to block bots, and rate-limit submissions per IP. Validate server-side, always. Client-side validation is for UX only; re-validate everything on the server, because anyone can bypass the browser. OWASP's REST Security Cheat Sheet is the reference for input validation, auth, and the rest.
One honesty note that applies to any platform you use: check what its API keys actually enforce. Some systems offer fine-grained scopes (a key limited to one action); others only let you label a key's intended scope without enforcing it. Don't assume a key is least-privilege just because the UI shows a scope field, verify whether the restriction is enforced before relying on it for security.
A few more habits worth building in. Send everything over HTTPS so keys and data aren't exposed in transit, non-negotiable for a public endpoint. Log submissions and failures so you can spot abuse or an outage early. And keep secrets in environment variables or a secret manager, never in source control, so a leaked repository doesn't leak your keys. None of this is exotic; it's the baseline that keeps a public form endpoint from becoming a liability.
Use Forms Expert as Your Form API Backend
If you'd rather not build the storage, validation, delivery, and security yourself, a form platform can be your API backend. Here's how Forms Expert does it, described precisely. Every published form is also a REST endpoint: you POST /f/{resourceId}/{slug} with a publishable pk_ key (passed as an X-API-Key header or a ?token= query parameter), and there are /is-active and /validate routes for pre-submit checks. The exact request body is documented in the REST submission guide, so it isn't repeated here.
The key model is two-tier and honest about its limits: a publishable pk_ key for client-side submission (it validates the request Origin, and wildcard origins like *.example.com are allowed) and a secret sk_ key for server-side use (which can be IP-restricted). Keys carry a live/test mode and an optional expiry, and can be rotated or revoked. One thing to be straight about: API-key scopes are stored and editable but not enforced, so treat keys as full-access for their tier and rely on the pk_/sk_ split and origin/IP restrictions for security, not on scopes. For delivery, submissions are pushed via signed webhooks (an X-FormsExpert-Signature HMAC SHA-256 header, retried up to five times with exponential backoff; 4xx responses other than 429 are treated as non-retryable), alongside email and Telegram notifications. Note there is no Slack notification channel. The recommended integration is the published @forms.expert/sdk (React, Vue, and vanilla builds, plus a CDN), and the whole embeddable-forms and API delivery model is one form served as a page, an embed, and this API at once, the one form, three channels idea. Monthly API request caps are 1,000 (Free), 10,000 (Starter), 100,000 (Pro), and 1,000,000 (Business). For the build-time counterpart, generating and managing forms via API, see form builder with API.
Frequently Asked Questions
What is an API form?
In the developer sense, an API form is a form whose submissions are sent to, or served by, an API endpoint instead of a built-in form handler. The form data is sent as an HTTP POST to a URL that validates it, stores it, and replies with a structured response (usually JSON), so you control where the data goes and what happens next. This is unrelated to the travel industry's APIS form (Advance Passenger Information System), which shares the abbreviation but is a different thing entirely. The developer meaning is about wiring a form to a REST API, your own backend, a third-party service, or a form platform's API, rather than relying on a hosted handler and a thank-you page.
How do I send HTML form data to an API?
From the browser, intercept the form's submit event with event.preventDefault(), build a FormData object from the form, and send it with fetch using method POST and the FormData as the body, the browser sets the multipart/form-data content type for you (don't set it by hand). Then check response.ok and read the JSON response. If you prefer to send JSON instead of multipart, convert the form to an object with Object.fromEntries(new FormData(form)), JSON.stringify it, and set a Content-Type: application/json header. For anything involving secret API keys, post from the browser to your own server first and forward to the API from there, so the key never reaches the client.
Should I send form data as multipart/form-data or JSON?
Use multipart/form-data when your form includes file uploads or when you're sending a raw FormData object, it's the format browsers use for native form posts and the one required for files, packaging each field and file as a separate part. Use application/json when you're sending structured, text-only data from your own code, which is the norm for server-to-server API calls and is easier to work with for nested data. A practical rule: browser form with files, multipart; structured data from your backend, JSON. Whichever you choose, set the matching Content-Type header (or, for FormData in the browser, let fetch set it automatically), and validate the parsed body on the server.
How do I receive form submissions on my backend?
Two models. Polling means your backend periodically asks the API for new submissions, which is simple but wasteful and adds latency. Webhooks mean the API pushes each submission to a URL you host the moment it arrives, which is real-time and efficient and is usually the better choice for forms. If you use webhooks, verify a signature on every incoming request (so you know it's genuinely from the API and not an attacker), acknowledge receipt by returning a 2xx status quickly, and do any slow processing asynchronously so you don't time out and trigger a retry. A robust webhook receiver also expects occasional duplicate deliveries and handles them idempotently.
How do I secure a form API with keys, origins, and CAPTCHA?
Layer several measures. Split your API keys by environment and exposure: a publishable key for client-side submission (safe to expose, ideally validating the request's origin) and a secret key kept server-side only, never put a secret key in browser code. Restrict allowed origins so a client-side key can't be reused from another domain, and where possible restrict secret keys to known IPs. Add a CAPTCHA or invisible honeypot plus per-IP rate limiting to block spam and abuse. And always re-validate input on the server, since client-side validation can be bypassed. Finally, check whether a platform's key scopes are actually enforced rather than just labelled, and rely on the publishable/secret split and origin or IP limits for real security.
What's the difference between a form API and a form builder API?
They operate at different stages. A form API (the subject of this guide) is about runtime: submitting form data to an endpoint and receiving submissions back, how a form's responses flow to and from an API. A form builder API is about build time: programmatically creating, configuring, and managing the forms themselves, generating a form, updating its fields, or listing forms via API, rather than handling submissions. You might use a form builder API to spin up forms from your own application and a form (submission) API to collect and route the responses. We cover the build-time side separately in our guide to choosing a form builder with an API, since the use cases and the parts of the platform they touch are different.
Can I POST directly to an API from the browser, or do I need a backend?
You can post directly from the browser, and for many cases it's fine, a public form submission to an endpoint that expects it, using a publishable key that's safe to expose. You need a backend in two situations: when the request requires a secret key (which must never appear in client code), and when the target API doesn't allow cross-origin browser requests because of CORS. In those cases, post from the browser to your own server, validate and add the secret there, then forward to the API. The rule of thumb: publishable keys and CORS-friendly endpoints can be called straight from the browser, while secret keys and same-origin-only APIs need a server in between.